
- August 2016
- July 2016
- March 2016
- February 2016
- April 2015
- January 2015
- December 2014
- October 2014
- September 2014
- August 2014
- July 2014
- July 2011
- June 2011
- May 2011
- April 2011
- March 2011
- February 2011
- January 2011
- December 2010
- November 2010
- October 2010
- September 2010
- August 2010
- July 2010
- May 2010
- April 2010
- March 2010
- February 2010
- January 2010
- December 2009
- November 2009
- September 2009
- August 2009
- June 2009
- April 2009
- February 2009
- January 2009
- November 2008
- February 2008
- January 2008
- December 2007
- November 2007
- October 2007
- April 2007
Installing Ubuntu onto a bootable USB stick or other device on a Mac
I recently had a reason to want to boot Linux on my Mac which already has a Windows Bootcamp partition. I wanted to just install Ubuntu onto a USB stick or hard drive and boot from that. The first bit turned out to be easy, but getting it to boot was quite arcane. I found lots of conflicting information on the web, and even after drinking from this fire hose of useful information it took a lot of trial and error to get it working.
It is possible – you just have to install like normal but requires a third-party boot loader and bit of jiggling before it will boot on its own. I’ve documented what I did below for posterity and others beating their head against the same issue.
1. First, make a bootable Ubunutu install disk:
http://www.ubuntu.com/download/desktop/create-a-usb-stick-on-mac-osx
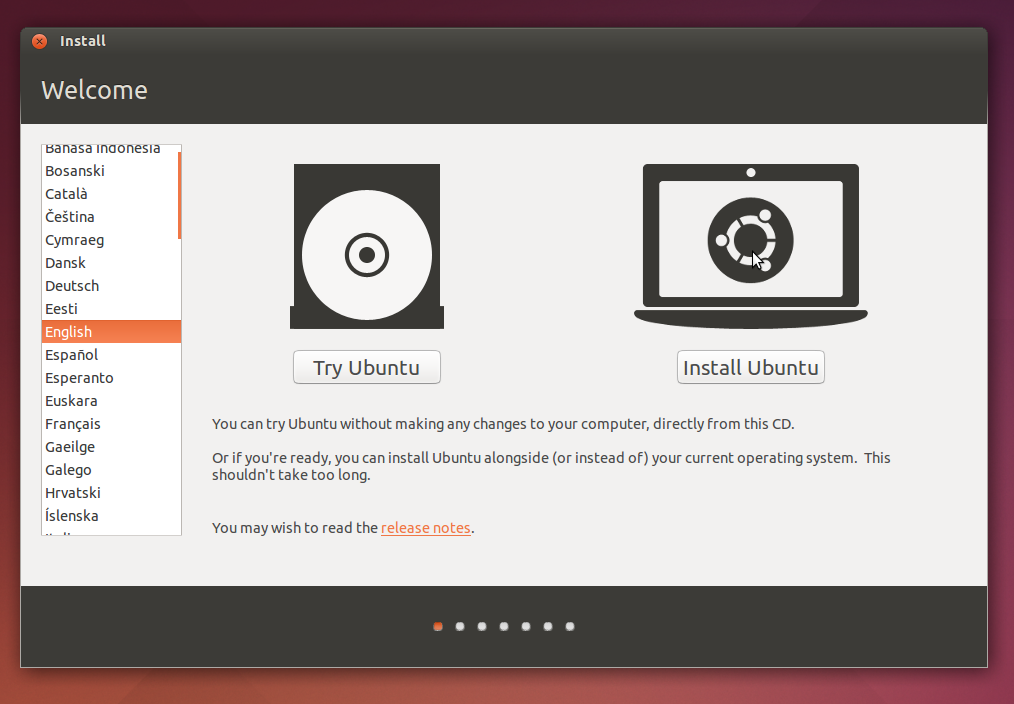
2. Boot, and by holding down the option key, get the boot menu. Ubuntu will show up as “EFI Boot” – boot that. Begin the installation.
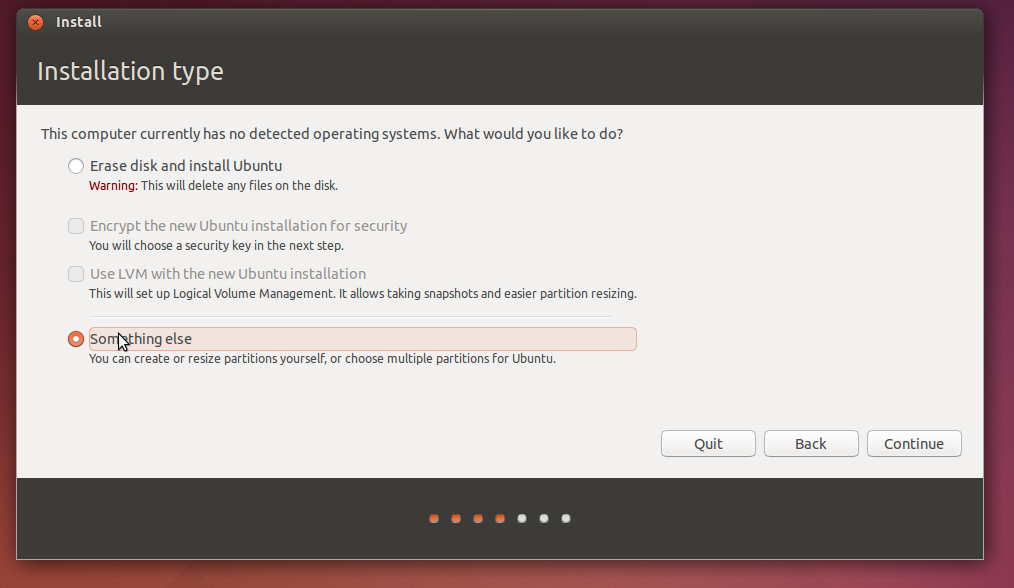
3. When you get to the installation type, pick “Something else”.
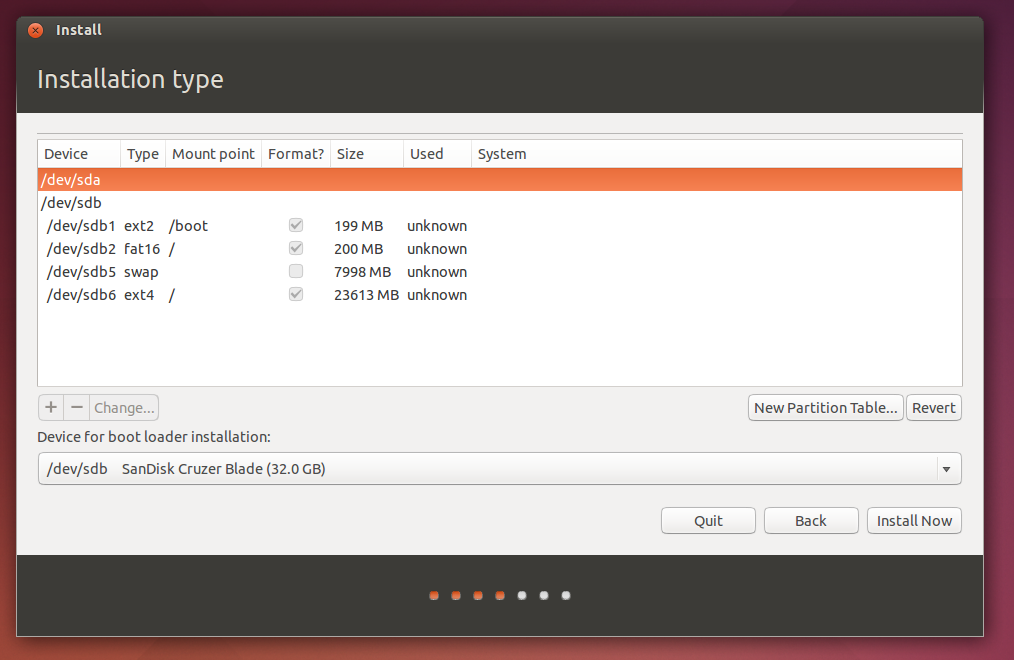
4. Find your USB disk from the list. Look at “Device for boot loader installation” down below, it will probably show the device with a readable name so you can be sure – for instance: “/dev/sdd SanDisk Cruzer 32.0 GB”. Select this device.

Note: My screenshots are from a virtual machine, yours will probably have the Mac’s internal HDD listed (for instance, /dev/sda, /dev/sdb) and all its myriad partitions. You want to be careful not to mess with those.
5. Now let’s partition the USB disk. Find the device above, and select “New Partition Table”. This will replace the existing partition or partitions with “Free space”.
6. Create the following partitions with the “+” button:
- A 200 MB EFI Boot partition
- A swap partition (optional: depending on your RAM and whether it’s a USB flash drive or hard drive). Twice your RAM up to a maximum of 8GB is recommended. On a flash drive, may wear the drive out faster.
- A 200 MB ext2 partition, mounted to /boot
- A main partition with at least 6 GB, file system ext4 (or your choice), mount to /
Note 1: You can add extra partitions if you like. For instance, a FAT32 partition for sharing with the Mac. I also don’t know if c) is necessary, more experimentation required.)
Note 2: I believe the option to add an EFI boot partition is only present when you booted the installer via EFI (which is going to be the case for your Mac).
7. Hit “install now” and complete the installation. Afterwards, it will prompt you to reboot. Come back to OS X.
8. Get gdisk and run the .pkg installer.
9. Get rEFInd as a “binary zip file” from the rEFInd page and unzip it somewhere.
10. Open Terminal, and go to the refind-bin-0.x.x directory.
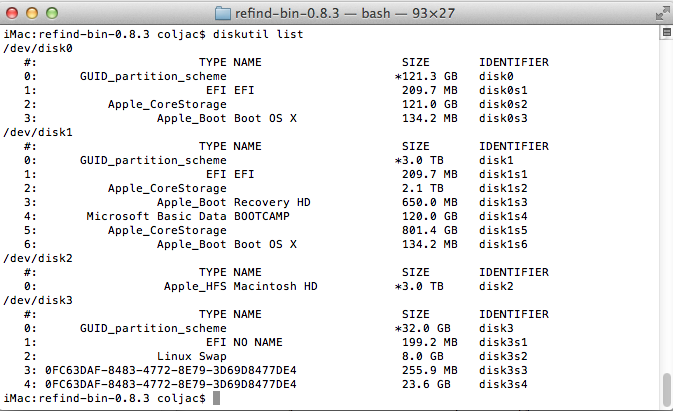
Type: diskutil list
Note the device that’s your USB, and the EFI boot partition. In this example, /dev/disk3 is the USB stick and /dev/disk3s1 is the EFI partition.
11. type sudo gdisk /dev/disk3 (or whichever number is appropriate)
- Type: x (enter)
- Type: o (enter)
You’ll see one ore more MBR partitions.
- Type: n (enter)
- Type: o (enter)
Now there will be one MBR partition.
- Type: w (enter) to save your changes.
11. In the rEFInd directory, run the installer script and point it at your EFI partition.
sudo ./install.sh --usedefault /dev/disk3s1
(or whichever disk is appropriate)
12. You should now be able to reboot with your USB device plugged in. After holding down option you should see an “EFI Boot” option. When selected, it will boot rEFInd. Alongside OS X and anything else you already have installed, there should be an option for linux/GRUB. Choose that and away you go!
Good luck and let me know if it worked for you with a comment.